This lesson describes how to configure a VPN using Hirschmann EAGLE20/30 and the LANCOM Advanced VPN Client using x.509 certificates.
Software versions used:
EAGLE20/30 firmware v02.0.01
Lancom Advanced VPN Client v3.00 Build 21499
Network plan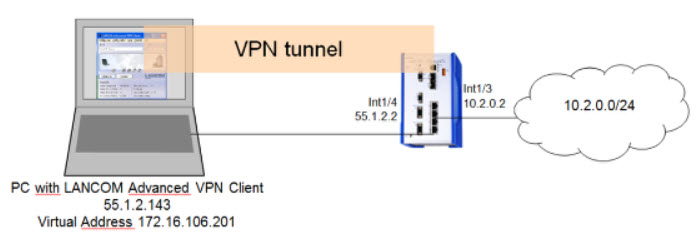
Install and start LANCOM Advanced VPN Client

The LANCOM Client with a 30 day evaluation period can be downloaded from http://www.lancom-systems.de
After installation start the LANCOM VPN Client.
Import Certificates

Copy the PEM export of the CA (in our example cacert.pem) and the PKCS#12 export of the LANCOM Client certificate (in our example vpnclient-cert.p12) in the CaCerts directory:
C:\Program Files (x86)\LANCOM\Advanced VPN Client\CaCerts
Note: The file extension of the CA export must be .pem otherwise the LANCOM Client will not find the CA.
CA Certificates
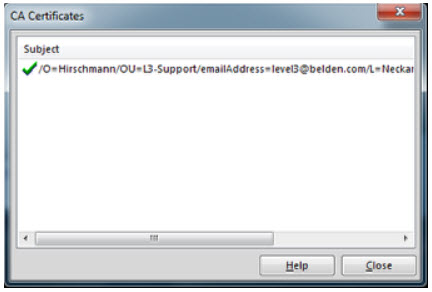
To verify if the LANCOM Client could load the CA, select Connection -> Certificates -> Display CA Certificates from the menu.
The distinguished name of the CA should be displayed, marked with a green checkmark.
Click Close.
Certificates Configuration
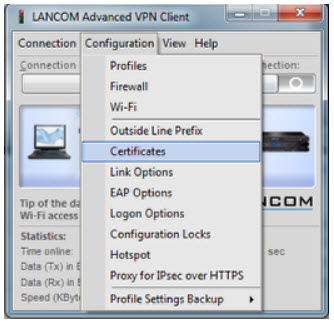
Select Configuration -> Certificates from the menu.
Certificate Selection
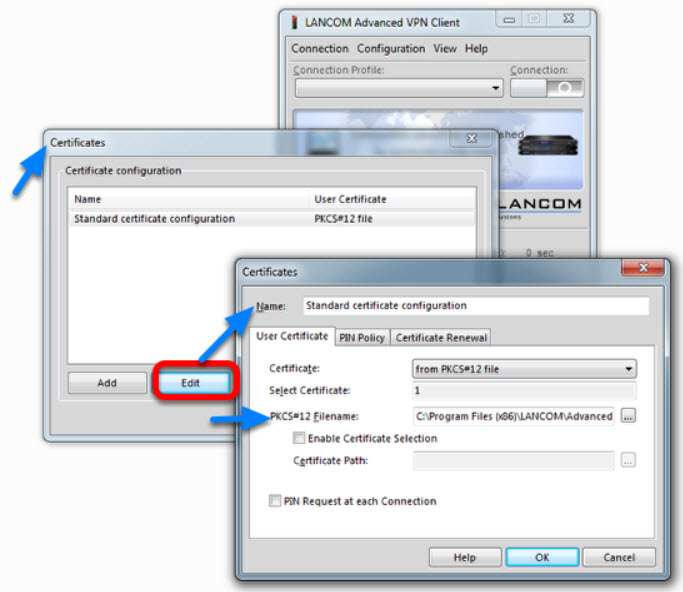
Highlight the Standard certificate configuration and click Edit.
Set the PKCS#12 Filename in our example C:\Program Files (x86)\LANCOM\Advanced VPN Client\CaCerts\vpnclient-cert.p12.
Click OK.
Close the Certificates configuration window.
Creating a new profile
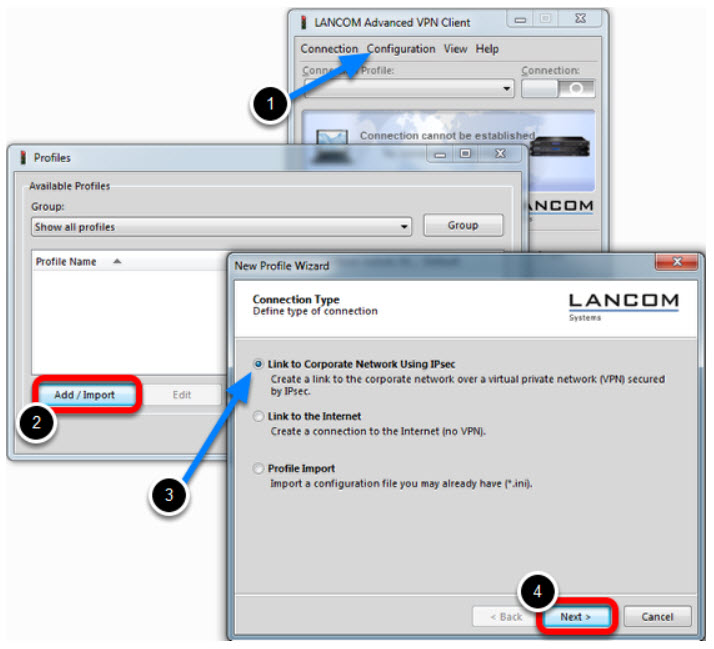
1. Select from the menu Configuration -> Profiles
2. Click Add / Import to create a new profile
3. Select Link to Corporate Network Using IPsec
4. Click Next
Profile Name

Enter a Profile Name
Click Next
Communication Medium
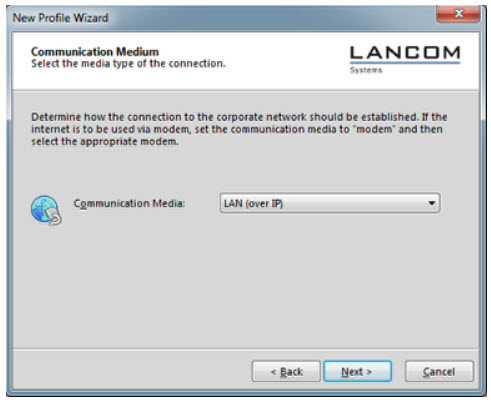
Select LAN (over IP) as communication media
Click Next
VPN Gateway Parameters
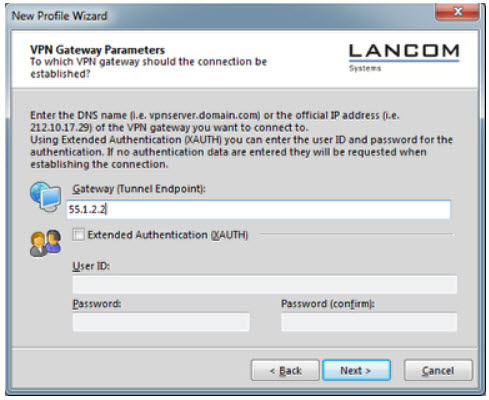
Enter the Gateway to which the connection should be established. Could be an IP address or DynDNS name.
IPsec Configuration
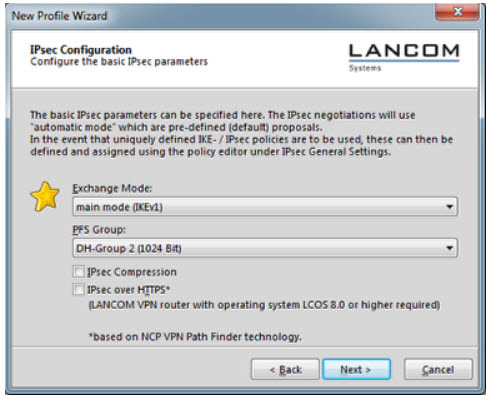
Set the Exchange Mode to main mode (IKEv1)
Set PFS Group to DH-Group 2 (1024 Bit)
Click Next
Local Identity (IKE)
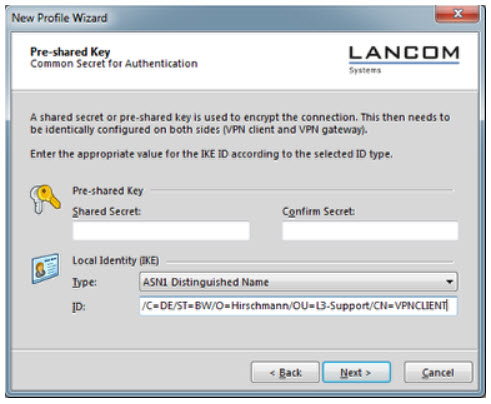
Delete the pre-shared keys
Set the Type to ASN1 Distinguished Name
Using the test certificates, copy the DN /C=DE/ST=BW/O=Hirschmann/OU=L3-Support/CN=VPNCLIENT in the ID field
Click Next
IPsec Configuration - IP Addresses
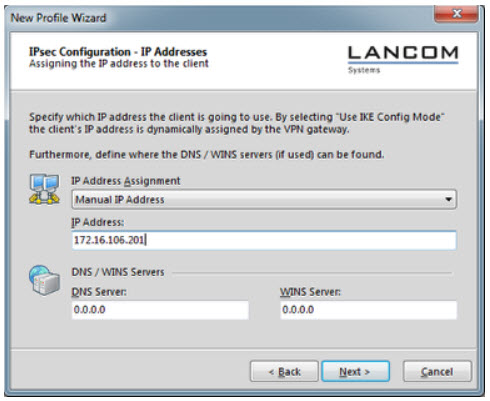
Set the IP Address Assignment to Manual IP Address.
IPsec Configuration - Split Tunneling
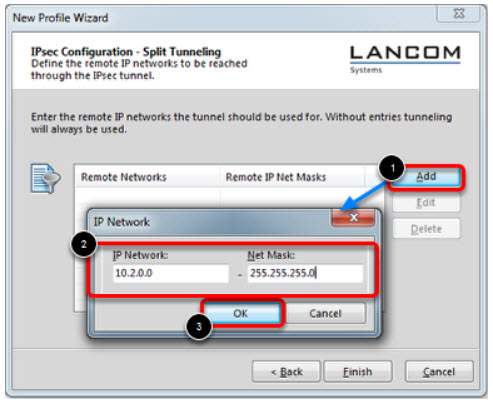
Define the remote IP network to be reached through the IPsec tunnel.
In our example 10.2.0.0/24.
Click Finish.
Profile Window
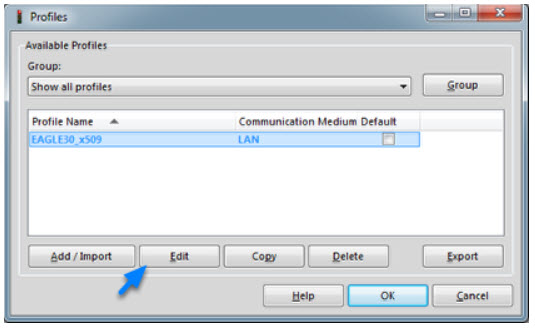
The new profile is created and displayed in the Profile window
Highlight the profile and click Edit.
Profile Settings

Highlight IPsec General Settings in the left pane.
Click Policy Editor
IKE Policy Settings
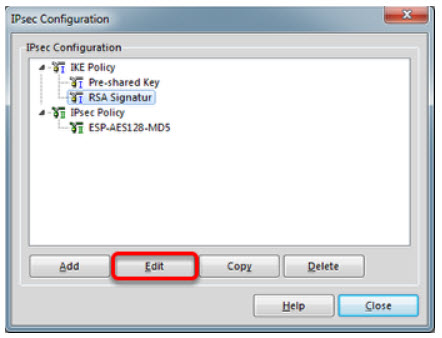
Highlight RSA Signature in the IKE Policy
Click Edit
Set Encryption to AES 128 Bit.
Set Hash to SHA.
Note: The specified encryption and hash algorithms must correspond to the settings in the EAGLE
IPsec Policy Settings
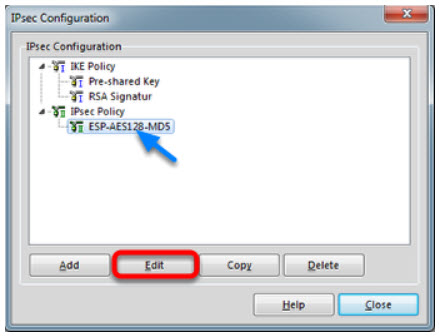
Highlight the entry ESP-AES128-MD5 in the IPsec Policy tree.
Click Edit.
IPSec Policy
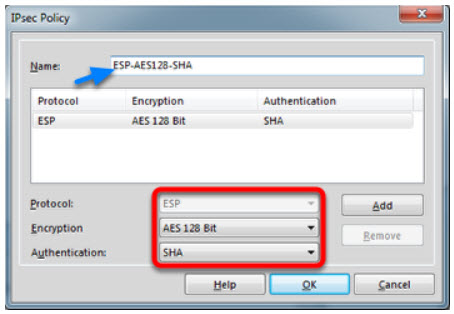
Change the Name to ESP-AES128-SHA.
Set Encryption to AES-128 Bit.
Set Authentication to SHA.
Click OK.
Close the IPsec Configuration window.
Select IKE and IPsec Policy
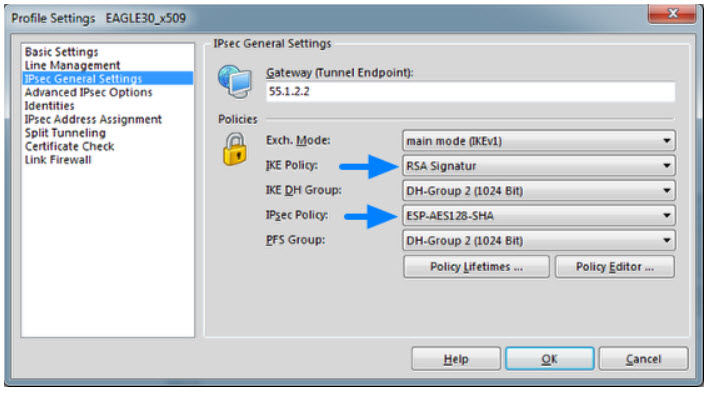
Set the IKE Policy to RSA Signature
Set the IPsec Policy to ESP-AES 128-SHA
Policy Lifetimes
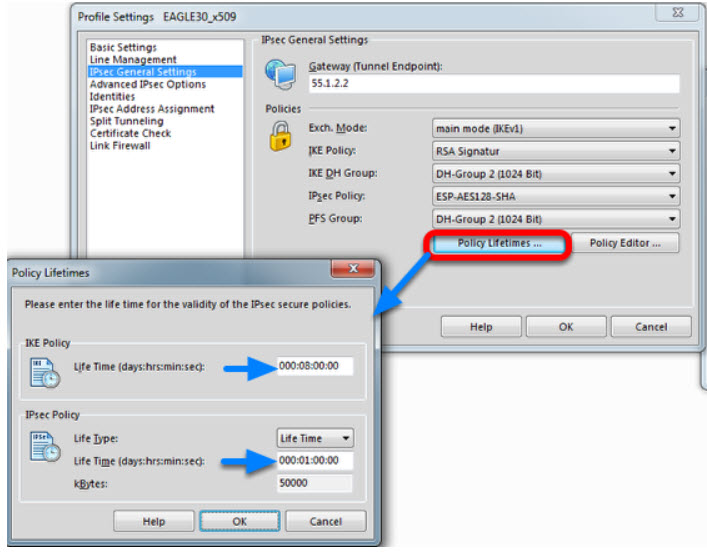
Click the button Policy Lifetimes.
Change the IKE Policy Life Time to 8 hours
Change the IPsec Policy Life Time to 1 hour.
Click OK.
Profile Settings - Identities
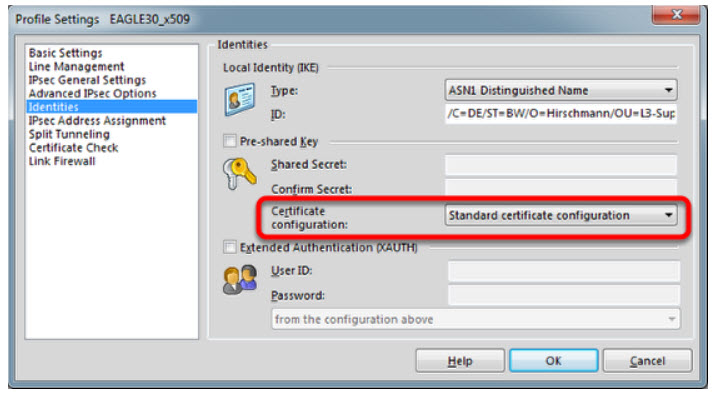
Navigate to Identities.
Select Standard certificate configuration.
Click OK.
Click Ok to close the Profile Window.
LANCOM Client configured
The LANCOM Client configuration is finished
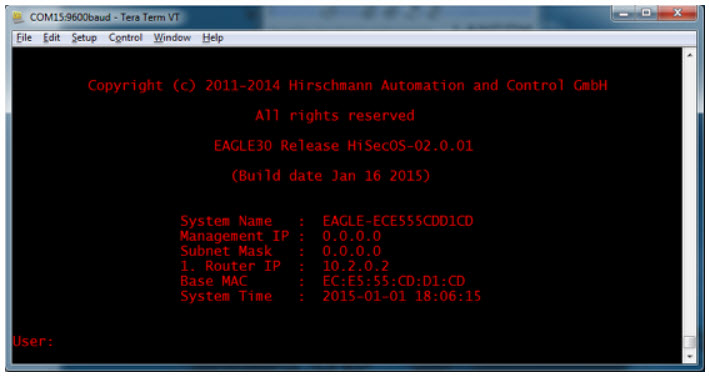
EAGLE20 Configuration
1. Set IP addresses of the router interfaces accordingly.
In our example: Int1/3 10.2.0.2/24; Int1/4: 55.1.2.2/24
2. Switch the EAGLE30 into router mode
Starting from a default configuration the CLI commands to configure the device via serial connection are:
!*(EAGLE)>enable
!*(EAGLE)#configure
!*(EAGLE)(Config)#interface 1/3
!*(EAGLE)((Interface)1/3)#ip address primary 10.2.0.2 255.255.255.0
!*(EAGLE)((Interface)1/3)#ip routing
!*(EAGLE)((Interface)1/3)#exit
!*(EAGLE)(Config)#interface 1/4
!*(EAGLE)((Interface)1/4)#ip address primary 55.1.2.2 255.255.255.0
!*(EAGLE)((Interface)1/4)#ip routing
!*(EAGLE)((Interface)1/4)#exit
!*(EAGLE)(Config)#ip routing
3. Login to the webinterface of the EAGLE30 from the int1/3 (IP 10.2.0.2)
VPN Configuration Web Interface
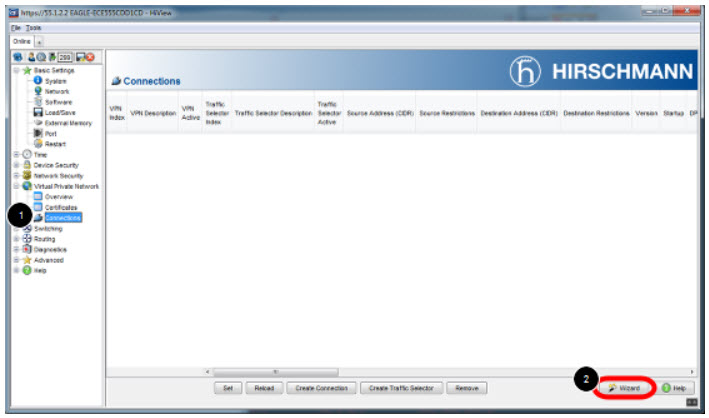
1. Navigate in the web interface tree to Virtual Private Network -> Connections.
2. Open the Wizard
VPN - Basic Settings
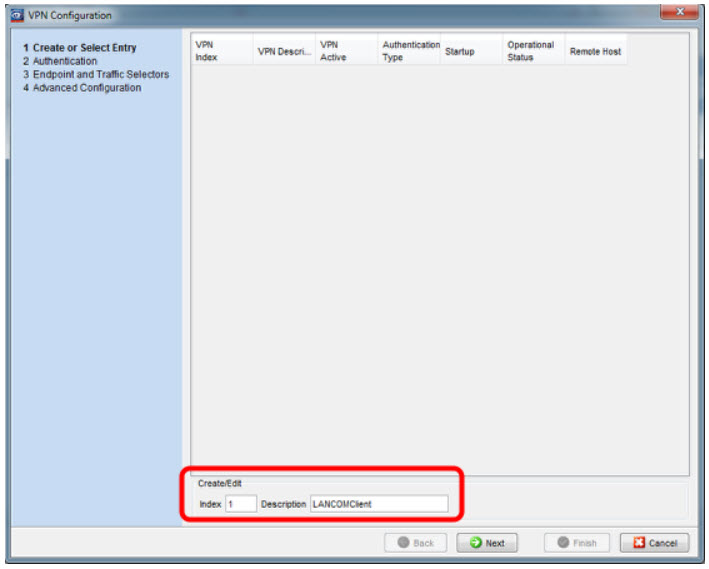
Specify the index and description of the VPN connection.
Click Next
Upload Certificate/Key

1. Select Certificate Bundle (PKCS12) from the Authentication Method drop-down box.
2. Click on Upload certificate/key
3. Specify the location of PKCS12 file and passphrase. The passphrase of the test certificate is 'vpnclient'.
4. Click OK
Upload successful
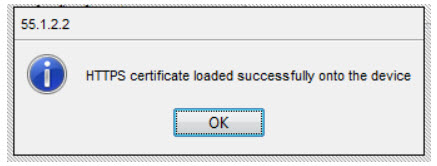
If the certificate file was uploaded successfully you see a confirmation message.
Click ok.
Select Local Certificate
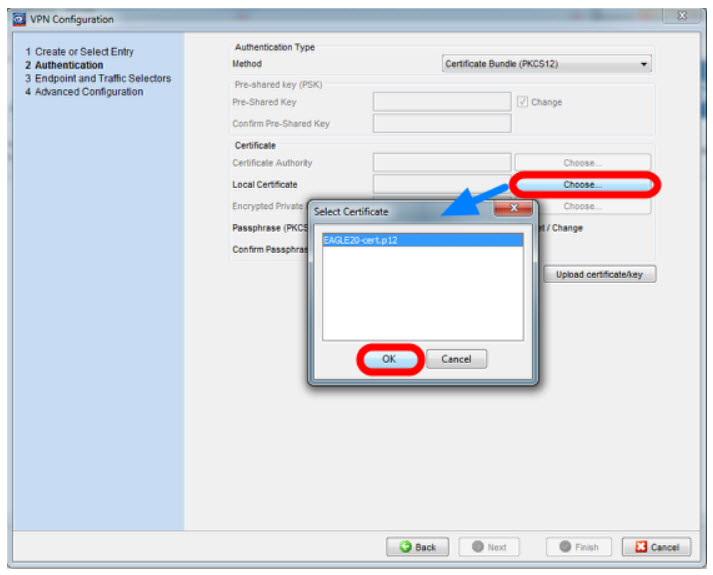
Click choose and select the local certificate.
Uncheck Set/Change Passphrase

1. uncheck Set/Change
2. click Next
Endpoint and Traffic Selectors
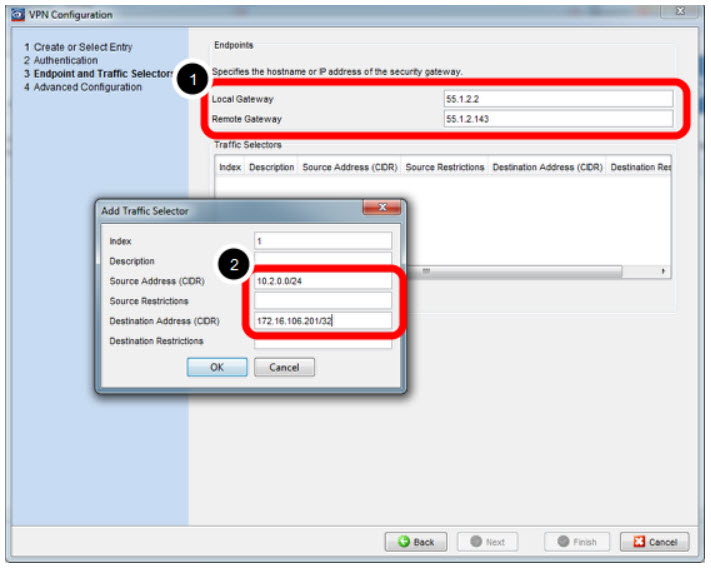
1. Specify local and remote gateway addresses.
In our example
Local Gateway: 55.1.2.2
Remote Gateway 55.1.2.143
2. Add Traffic Selector with
Source Address (CIDR): 10.2.0.0/24
Destionation Address (CIDR): 172.16.106.201/32 (virtual address)
Advanced Configuration
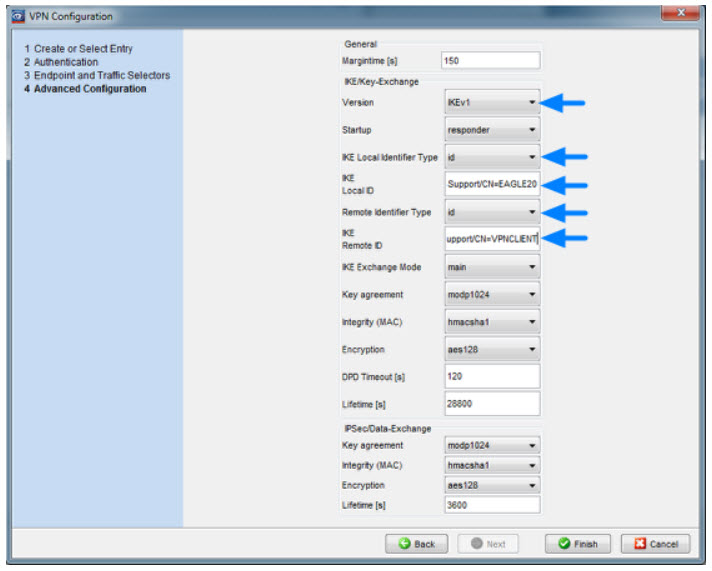
Set IKE Version 1 and specify the local and remote IDs (ASN1 DN of the certificates -see certindex.txt)
Version: IKEv1
IKE Local Identifier Type: id
IKE Local ID: /C=DE/ST=BW/O=Hirschmann/OU=L3-Support/CN=EAGLE20
IKE Remote Identifier Type: id
IKE Remote ID: /C=DE/ST=BW/O=Hirschmann/OU=L3-Support/CN=VPNCLIENT
Click Finish
Activate the VPN Connection
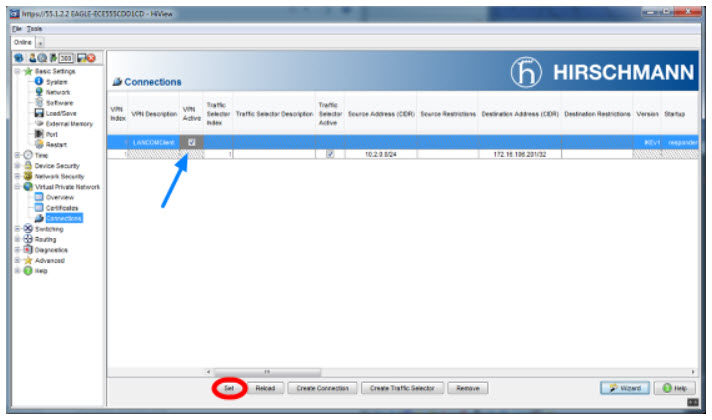
Activate the VPN connection
Click Set
Initialize Tunnel Setup
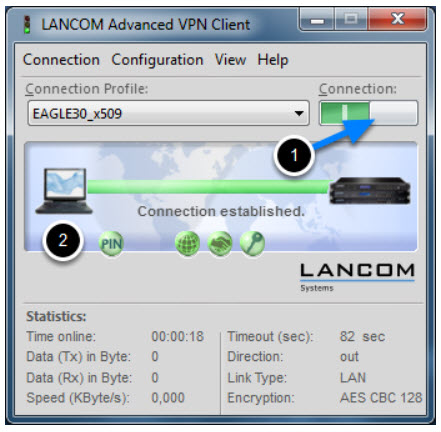
1. Move the Connection slide to the right to initialize the tunnel setup.
You will get prompted to enter the certificate's pin. In our example 'test'
2. The connection should be established successfully.
LANCOM Advanced VPN Client - Log
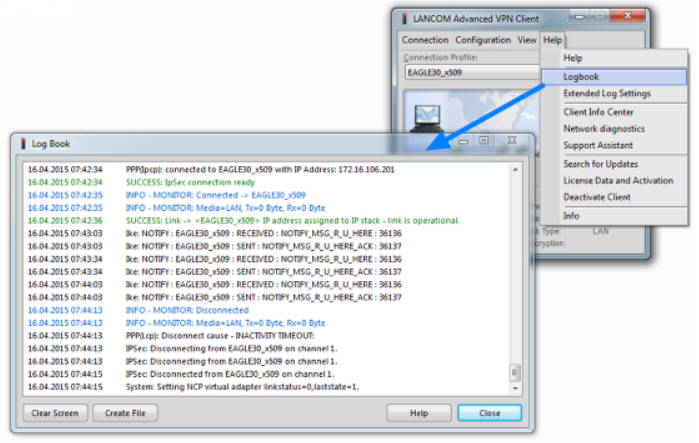
Select Log -> Logbook
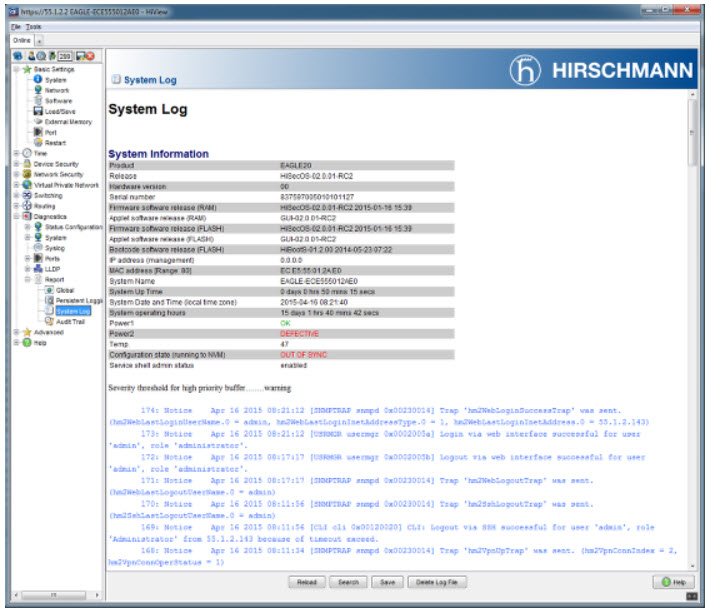
VPN Overview
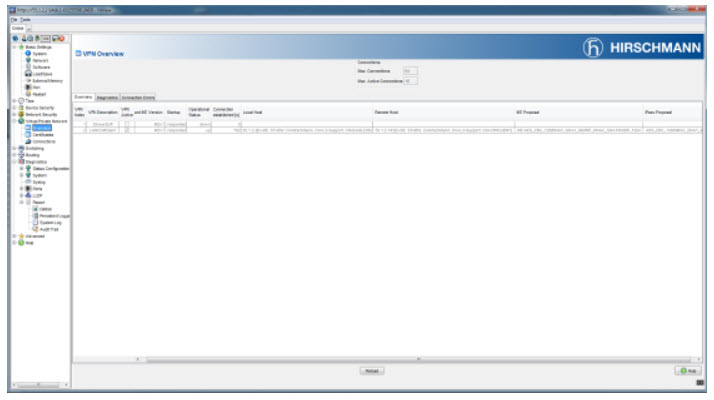
In the EAGLE20/30 web interface navigate to Virtual Private Network - Overview to check if the VPN connection is up.